PCluster
PCluster Product of Research Gateway helps you to set up a high-performance computing Cluster based on AWS Parallel Cluster 3.0.
PCluster enables you to quickly build an HPC compute environment in AWS. It automatically sets up the required compute resources and shared filesystem. You can use PCluster with batch schedulers, such as AWS Batch and Slurm. PCluster facilitates quick-start, proof-of-concept deployments as well as production deployments.
Watch a video on how to provision a PCluster product.
Parameters
Parameter |
Details |
|---|---|
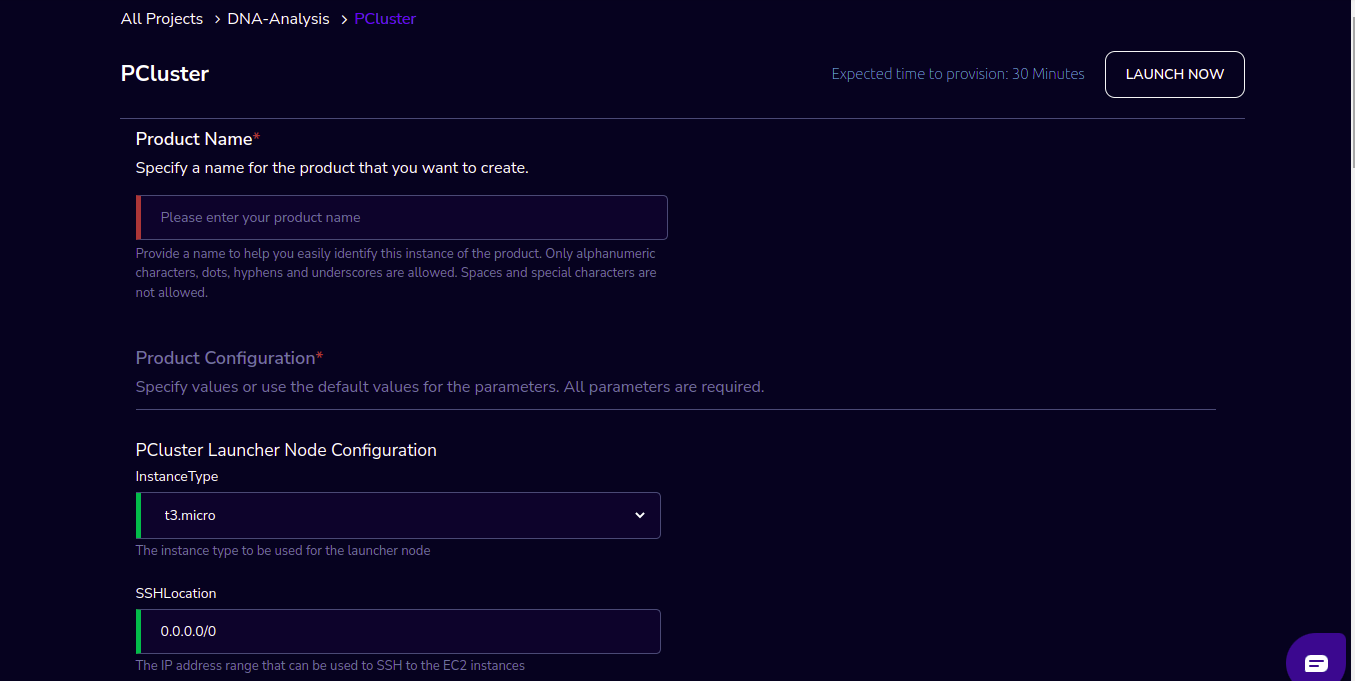
Product Name |
Provide a name to help you easily identify this instance of the product. Only alphanumeric characters, dots, hyphens and underscores are allowed. Spaces and special characters are not allowed. Eg: MedicalResearch |
InstanceType |
Choose instance type in the drop-down list Eg: t2.small |
SSHLocation |
Enter the IP address range that can be used to SSH to the EC2 instances |
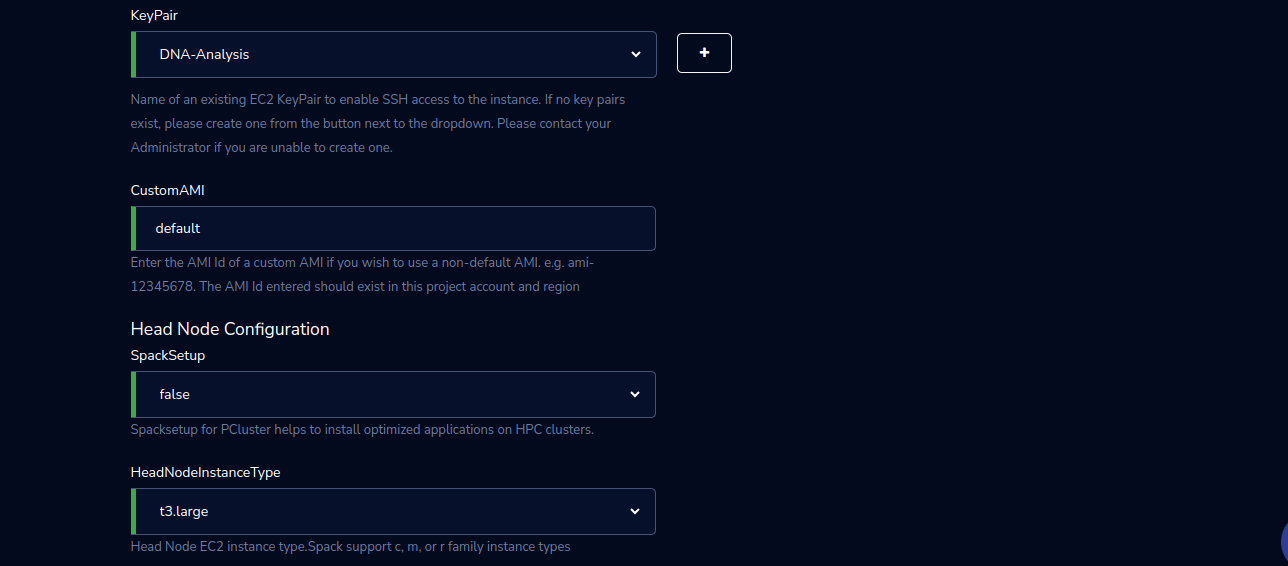
KeyPair |
Choose a KeyPair in the dropdown list. Note: If KeyPair is not available in the drop-down, click on the “+” button. A KeyPair creation form is opened. Fill the details in the form and click on the “Create KeyPair” button. Now that KeyPair is available in the list. Remember to save the private key file securely for future use. Do not share this file with others for the security of your account. |
CustomAMI |
Enter the AMI Id of a custom AMI if you wish to use a non-default AMI. e.g. ami-12345678. The AMI Id entered should exist in this project account and region |
HeadNodeInstanceType |
Select Head Node EC2 instance type from the drop-down list |
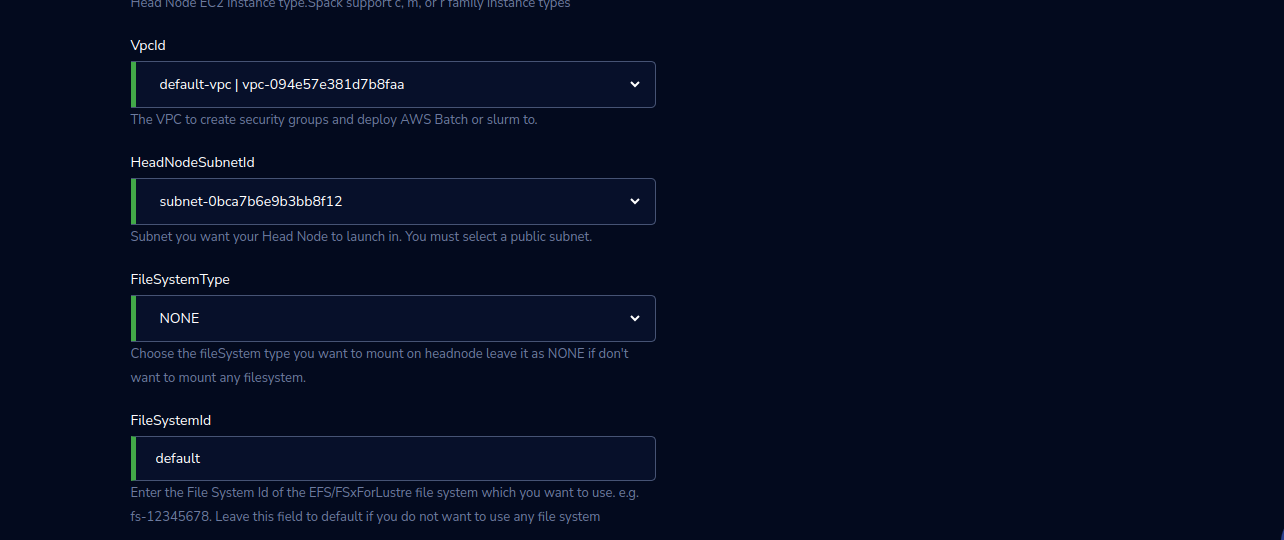
VpcId |
Select The VPC to create security groups and deploy awsbatch or slurm from the drop-down list |
HeadNodeSubnetId |
Select the Subnet you want your Head Node to launch in from the drop-down list. You must select a public subnet. |
FileSystemType |
Choose the fileSystem type EFS/FSxForLustre/EBS (provisioned earlier) which you want to mount on the head node leave it as NONE if don’t want to mount any filesystem. |
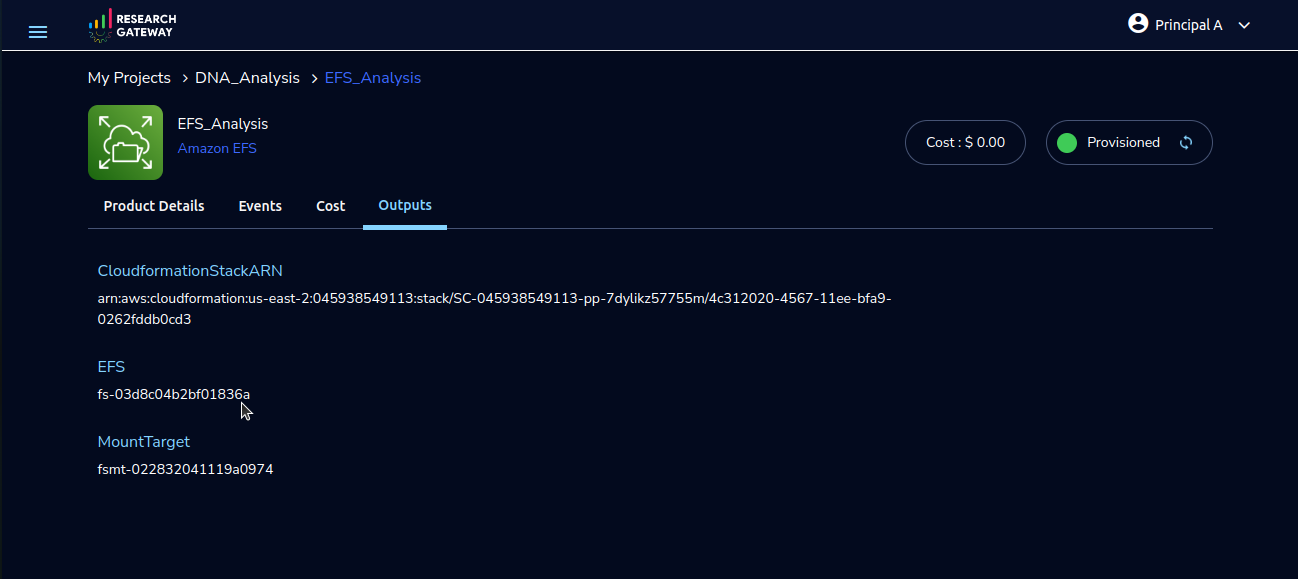
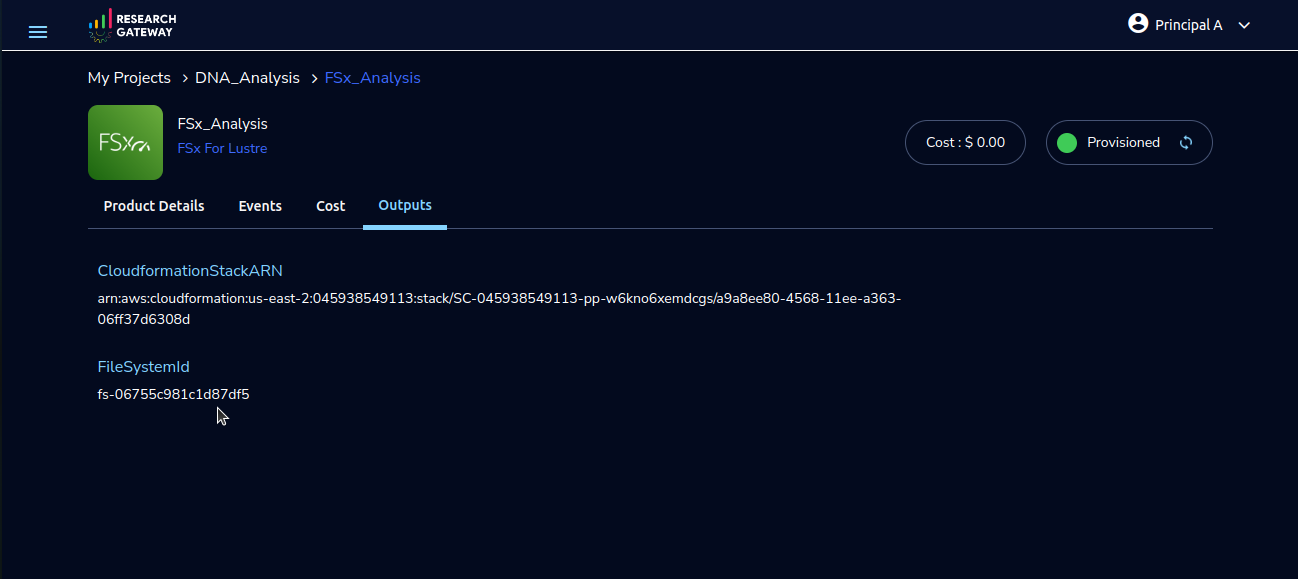
FileSystemId |
Enter the File System Id of the EFS/FSxForLustre/EBS file system which you want to use. e.g. fs-12345678. Leave this field to default if you do not want to use any file system |
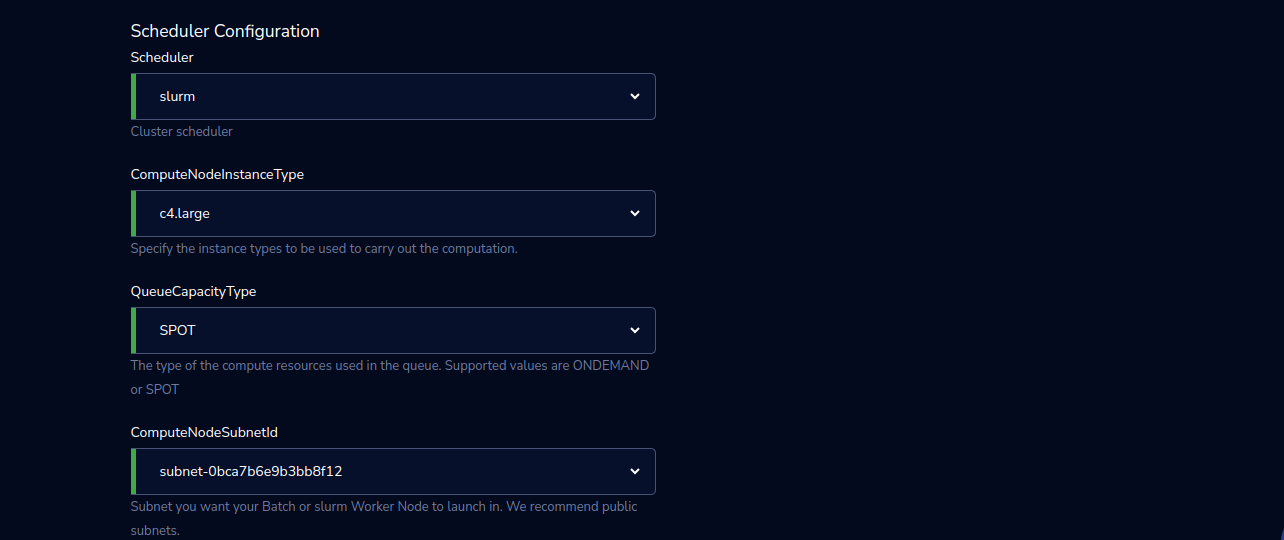
Scheduler |
Select a Cluster scheduler from the drop-down list |
ComputeNodeInstanceType |
Select the instance types to be used to carry out the computation from the drop-down list |
QueueCapacityType |
Select the type of compute resources used in the queue. Supported values are ONDEMAND or SPOT from the drop-down list. |
ComputeNodeSubnetId |
Select the Subnet you want your Batch or Slurm Worker Node to launch in from the drop-down list. We recommend public subnets. |
ComputeEnvMinvCpus |
Enter the minimum number of CPUs to be kept in running state for the Batch/slurm Worker Nodes. If you give a non-zero value, some worker nodes may stay in a running state always and you may incur higher costs. |
ComputeEnvMaxvCpus |
Enter the maximum number of CPUs for the default Batch or slurm Compute Environment |
ComputeEnvDesiredvCpus |
Enter the Desired number of CPUs for the default Batch Compute Environment |
SpotBidPercentage |
Enter the maximum percentage of On-Demand pricing you want to pay for Spot resources. You will always pay the lowest Spot market price and never more than your maximum percentage. |
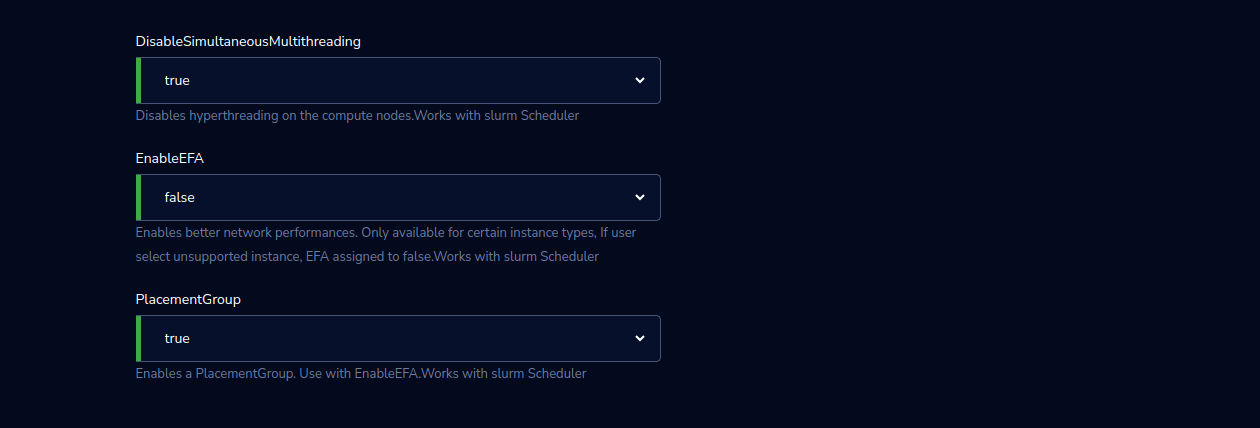
DisableSimultaneousMultithreading |
Select the true/false value from the drop-down list. If the selected value is true it will Disable hyperthreading on the compute nodes. Works with Slurm Scheduler. |
EnableEFA |
Select the true/false value from the drop-down list. If the selected value is true it will Enable better network performances. Only available for certain instance types, If the user selects the unsupported instance, EFA is assigned to false. Works with slurm Scheduler |
PlacementGroup |
Select the true/false value from the drop-down list. If the selected value is true it will Enable a PlacementGroup. Use with EnableEFA.Works with slurm Scheduler |

Steps to launch
Click on the project on the “My Projects” page.
Navigate to the available products tab
Click the “Launch Now” button on the “PCluster” product card. A product order form will open. Fill the details in the form and click the “Launch Now” button. You will see a PCluster being created. Once the cluster provisioning is completed, that product should appear in the “Active” state.
Estimated time to provision - 40 minutes
Steps to connect
Click on “SSH Terminal” under the “Connect” list on the right side of the page. This will open the SSH Terminal in a new browser tab.
Note
If you have selected “SpackSetup” as true during launch then you will be able to install spack packages. Click on “SSH Terminal” under the “Connect” list on the right side of the page and run the below commands in SSH Window
ls - run this command in the home directory folder and check if you find “spack” in the folder.
spack find - this command will show how many packages are installed. Once all the packages are done installing ( usually it will take 2 hours) it will show the message Spack setup completed.
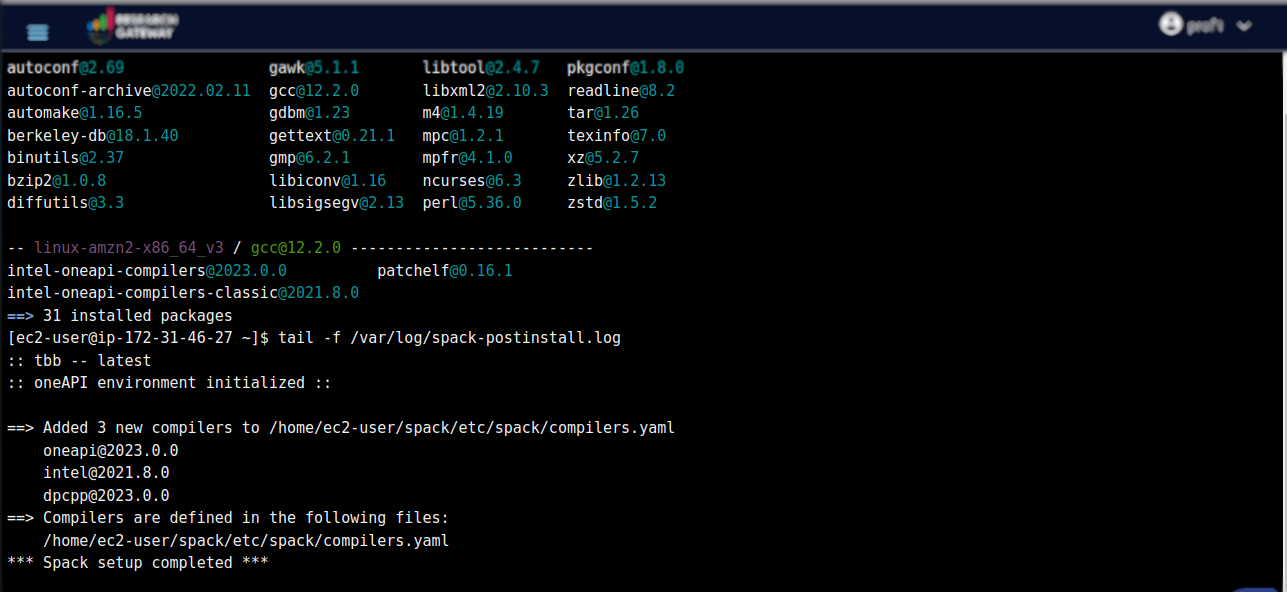
tail -f /var/log/spack-postinstall.log - run this command in home directory folder. This will show the Sequence of all events and packages installed.
Note
If you have selected “Scheduler” as slurm during launch if you want to submit a job and get the output you can follow the below steps and run the below commands in SSH Window
Create a job script file:
vi <filename>.sh
Enter the contents in the file:
example:
#!/bin/bash
sleep 30
echo “Hello World from $(hostname)”
Save and exit the file.
Submit the job:
sbatch <filename>.sh
This command submits the job script to the Slurm scheduler for execution. It returns a job ID, indicating that the job has been submitted successfully.
Check the job status:
squeue
This command shows the status of all jobs in the Slurm queue. Look for your job in the output. The job ID, partition, name, user, state, time, nodes, and nodelist will be displayed.
Wait for the job to finish: Allow the job to run for the specified duration in the script (30 seconds in this case).
Check the job status again:
squeue
Now that the job has been completed, you will no longer see it in the queue.
Check the output:
ls -l
This command lists the files in the current directory. Look for the slurm-JOBID.out file, where JOBID is the ID of your submitted job.
View the output:
cat slurm-JOBID.out
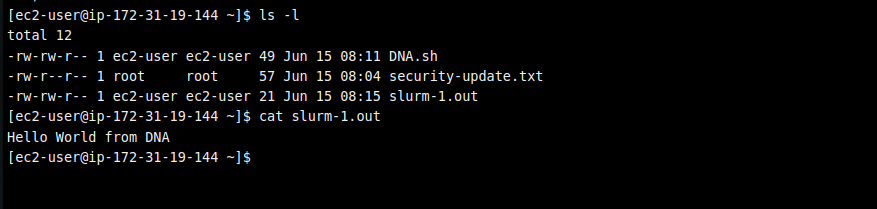
Replace JOBID with the actual job ID. This command displays the output of your job, which should include the “Hello World” message along with the hostname.
If you have selected “Scheduler” as awsbatch during launch if you want to submit a job and get the output you can follow the below steps and run the below commands in SSH Window
Create a job script file:
vi <filename>.sh
Enter the contents in the file:
example:
#!/bin/bash
sleep 30
echo “Hello World from $(hostname)”
Save and exit the file.
Submit the job:
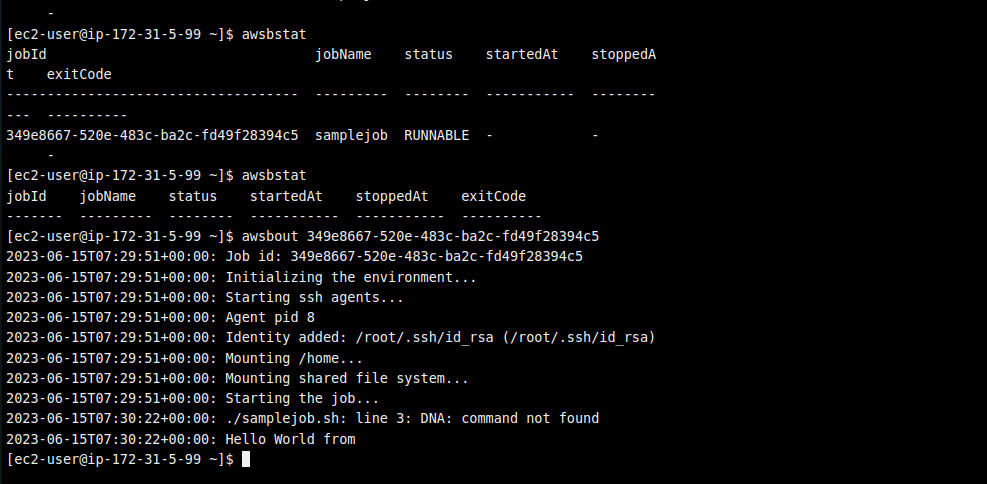
awsbsub <filename>.sh -cf -jn samplejob
This command submits the job named samplejob using the script file <filename>.sh to AWS Batch for execution. The -cf and -jn options may be custom options specific to your environment or an external tool.
Check the job status:
awsbstat
This command retrieves the status of all jobs in the AWS Batch job queue. It will display information about the submitted job, such as its ID, name, status, and other details.
Wait for the job to finish: Allow the job to run for the specified duration in the script (30 seconds in this case).
Check the job status again:
awsbstat
Now that the job has been completed, you will no longer see it in the queue.
View the job output using awsbout
awsbout <JOB_ID>
Replace <JOB_ID> with the actual ID of the job you submitted. This command fetches the output of the specified job, allowing you to view the job’s output or logs.
Note
The commands awsbsub, awsbstat, and awsbout may not be standard AWS Batch CLI commands. They might be custom commands or wrappers specific to your environment or an external tool you are using. Ensure that you have the necessary CLI or tools configured and installed correctly to use these commands in your AWS Batch environment.
Please refer to the official documentation or specific documentation of the tool you are using for further details and the correct usage of these commands in your AWS Batch and AWS ParallelCluster environment.
Enter “ec2-user” as the username. Select “Pem file” as the Authentication type. Upload the pem file in the “Pem file” field. Click Submit. You should now be connected to the EC2 instance via SSH. Scroll to the top of the Terminal screen and click the “Terminate” button to end the session. Alternatively, type exit and hit enter in the terminal.
You can de-provision the product through the “Terminate” option.
Click on “Remote Desktop” under the “Connect” list on the right side of the page. The cluster head-node by default has NICE DCV installed which allows you to connect to the head-node via a GUI interface. This is especially useful to visualize the results of the jobs that you run on the cluster (e.g. using Paraview to view the results of OpenFOAM jobs).
Watch a video that demonstrates using OpenFOAM on a PCluster product.
Other considerations
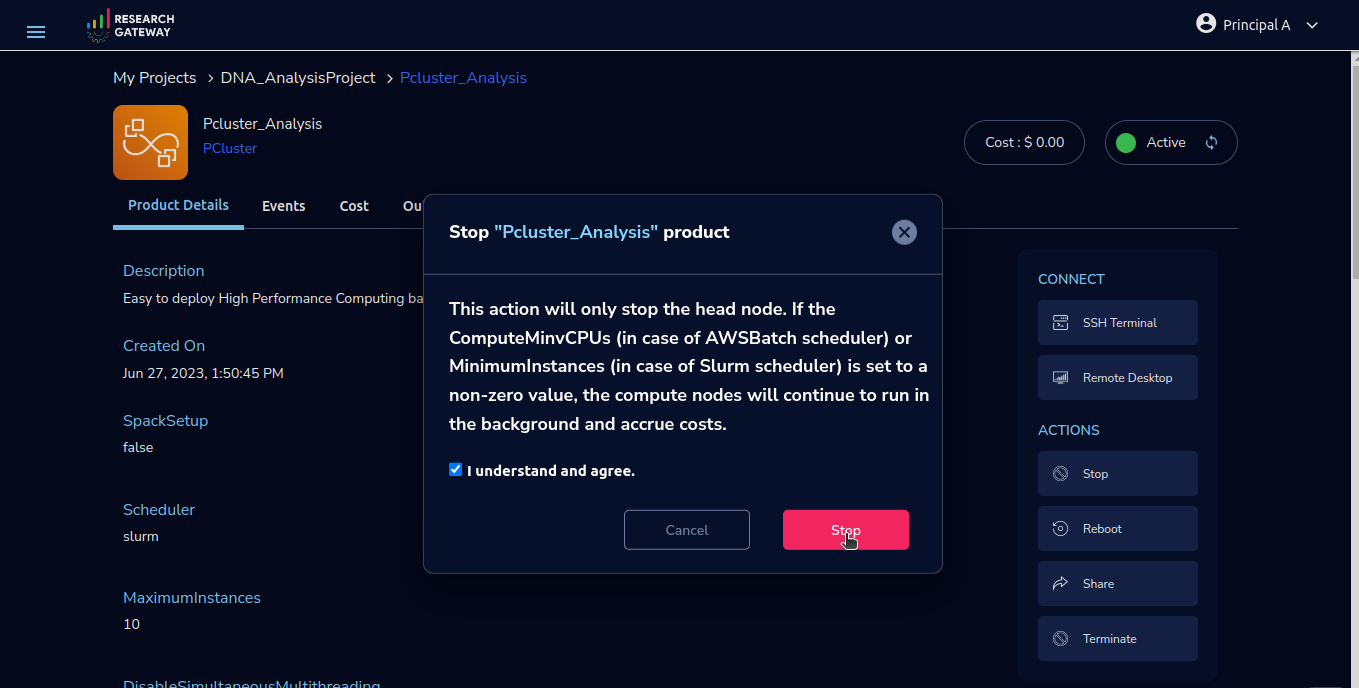
You can stop your instance using the “Stop” button on the product details page of your instance. The instance will incur lower costs when it is stopped than when it is running.
Note
This action will only stop the head node. If the ComputeMinvCPUs (in case of AWSBatch scheduler) or MinimumInstances (in case of Slurm scheduler) is set to a non-zero value, the compute nodes will continue to run in the background and accrue costs.
Conversely, if the instance is stopped, use the “Start” button to get the instance “Running”.
You can share the product with all the members of the project using the “Share” button on the product details page of your product. If you share the product with the project, you will have to share the PEM key file outside of Research Gateway.
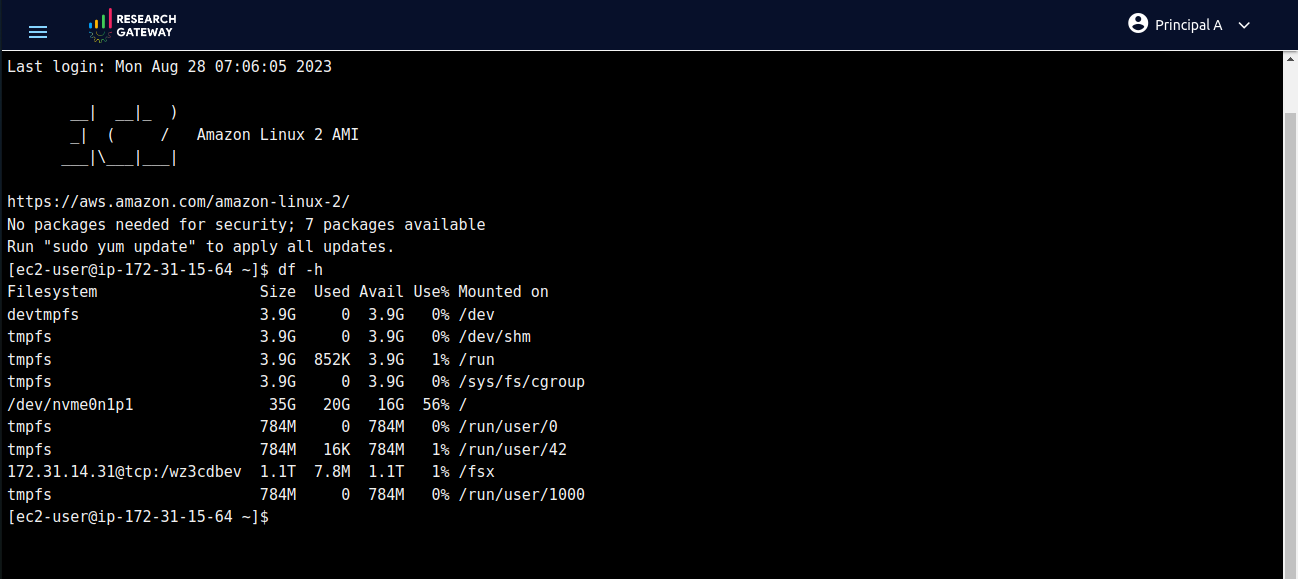
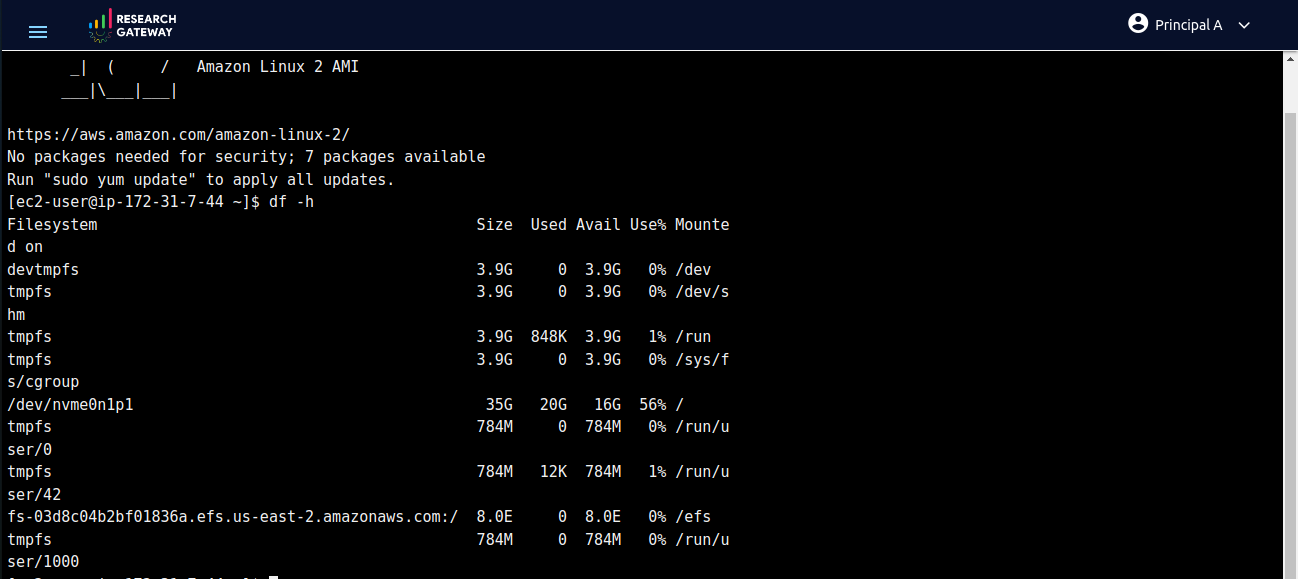
For configuring your AWS ParallelCluster instance with Amazon EFS or FSx for Lustre, follow these steps: copy the FileSystemId from the Outputs tab of Amazon EFS or FSx for Lustre, choose the appropriate FileSystemType and add the FileSystemId when launching through the PCluster product’s launch form. After product comes to active perform SSH Terminal, execute the df -h command to verify mounting and ensure the successful setup of your chosen file system.